2/03/2018

EdgeRouterでLets Encrypt

できるだろう、できるだろう!と思っていて、環境を汚さず、かつ自動更新してくれそうなもので簡単なものを探していたのだが、これが一番良さげ。

https://github.com/j-c-m/ubnt-letsencrypt/blob/master/README.md

注意:実行前に必ずスクリプトを確認すること。一度、スクリプトを作って、自分の環境に置換をして実行したほうがいいかも

また、しくるとあるいは変なところでコミットすると、環境がおかしくなったり、アクセスができなくなることがあるので、必ずバックアップを取っておくこと。

事前設定

設定の条件は以下

subdomain.example.com - FQDN
192.168.1.1 - LAN IP of Router
eth0 - WAN device

事前にDNSの設定をしておく。nslookupでgoogleのDNSにFQDNを聞いて、ちゃんとWAN側のIPを返してくることを確認すること!!!

80番ポートをもしかするとこのルータが答えるようにしておかないとダメかも。自分は、80番ポート開けてた。。。後で要確認!

SSHでログイン

mkdir -p /config/.acme.sh
curl -o /config/.acme.sh/acme.sh https://raw.githubusercontent.com/Neilpang/acme.sh/master/acme.sh
curl -o /config/scripts/renew.acme.sh https://raw.githubusercontent.com/j-c-m/ubnt-letsencrypt/master/scripts/renew.acme.sh
chmod 755 /config/.acme.sh/acme.sh /config/scripts/renew.acme.sh


configure
set system static-host-mapping host-name subdomain.example.com inet 192.168.1.1
set service gui cert-file /config/ssl/server.pem
set service gui ca-file /config/ssl/ca.pem
set system task-scheduler task renew.acme executable path /config/scripts/renew.acme.sh
set system task-scheduler task renew.acme interval 1d
set system task-scheduler task renew.acme executable arguments '-d subdomain.example.com -i eth0'

sudo /config/scripts/renew.acme.sh -d subdomain.example.com -i eth0


実行すると以下のようなメッセージが流れる。

[Sat Feb 3 07:31:42 UTC 2018] Stopping GUI service.
[Sat Feb 3 07:31:42 UTC 2018] Starting temporary ACME challenge service.
[Sat Feb 3 07:31:43 UTC 2018] Creating domain key
[Sat Feb 3 07:31:45 UTC 2018] The domain key is here: /config/.acme.sh/subdomain.example.com/subdomain.example.com.key
[Sat Feb 3 07:31:45 UTC 2018] Single domain='subdomain.example.com'
[Sat Feb 3 07:31:45 UTC 2018] Getting domain auth token for each domain
[Sat Feb 3 07:31:45 UTC 2018] Getting webroot for domain='subdomain.example.com'
[Sat Feb 3 07:31:45 UTC 2018] Getting new-authz for domain='subdomain.example.com'
[Sat Feb 3 07:31:46 UTC 2018] The new-authz request is ok.
[Sat Feb 3 07:31:47 UTC 2018] Verifying:subdomain.example.com
[Sat Feb 3 07:31:51 UTC 2018] Success
[Sat Feb 3 07:31:51 UTC 2018] Verify finished, start to sign.
[Sat Feb 3 07:31:52 UTC 2018] Cert success.
-----BEGIN CERTIFICATE-----
省略/ないしょ!
-----END CERTIFICATE-----
[Sat Feb 3 07:31:52 UTC 2018] Your cert is in /config/.acme.sh/subdomain.example.com/subdomain.example.com.cer
[Sat Feb 3 07:31:52 UTC 2018] Your cert key is in /config/.acme.sh/subdomain.example.com/subdomain.example.com.key
[Sat Feb 3 07:31:52 UTC 2018] The intermediate CA cert is in /config/.acme.sh/subdomain.example.com/ca.cer
[Sat Feb 3 07:31:52 UTC 2018] And the full chain certs is there: /config/.acme.sh/subdomain.example.com/fullchain.cer
[Sat Feb 3 07:31:53 UTC 2018] Run reload cmd: cat /config/.acme.sh/subdomain.example.com/subdomain.example.com.cer /config/.acme.sh/subdomain.example.com/subdomain.example.com.key > /config/ssl/server.pem; cp /config/.acme.sh/subdomain.example.com/ca.cer /config/ssl/ca.pem
[Sat Feb 3 07:31:53 UTC 2018] Reload success
[Sat Feb 3 07:31:53 UTC 2018] Stopping temporary ACME challenge service.
[Sat Feb 3 07:31:54 UTC 2018] Starting GUI service.

sudo /config/scripts/renew.acme.sh -d subdomain.example.com -i eth0

commit
save

これでFQDNにログインしたときに証明書が有効になっているはず!


ssh-recovery 設定

ssh-recovery は、ルータのポート設定にしくったときにIPv4でログインができなくなったときの仕組みでIPv6でログインをする。ただし、ずっとログインができるのもまずいので、起動後何分かまでだけである。その起動後何分かあるいは永遠かは変えられる。

某社のルータのように起動後TFTPが一瞬空いているのと似ている。

さて、設定は以下のように行なった。

set service ssh-recovery listen-on eth1

とりあえず、LAN側で空いて入ればいいやということで

Commitをすると以下のメッセージが出て来る。

Warning: the SSH recovery service is started during system boot-up and
stopped when the lifetime expires.

If you want the changes to be applied now then stop/start/restart
the service manually by issuing:
sudo ssh-recovery stop
sudo ssh-recovery start

You can check the configuration with:
sudo ssh-recovery conf

どうやらこの設定はサービスを再起動しないと効かないとのこと。また設定を確認するには、コンフィグからではなく別のコマンドから。

サービスを再開させると以下のようなメッセージが表示される。

sudo ssh-recovery start
ssh-recovery: starting...
ssh-recovery: if=(eth1) port=(60257) terminate-timeout=(60)
ssh-recovery: enabling link on interfaces...
ssh-recovery: eth1 :: Mac=(秘密!)
ssh-recovery: waiting for interface/address initialization...


ssh-recovery: service started :: pid=(7982)

設定はこんな感じ

sudo ssh-recovery conf
ssh-recovery: if=(eth1) port=(60257) terminate-timeout=(60)

活用することがないことを祈りたい!


EdgeRouterの最新ファームウェア v1.10の適用

EdgeRouterのβファームを扱うフォーラムでEdgeRouter v1.10.0のファームが公開されている。まだ、メインサイトでは公開されてはいない。

https://community.ubnt.com/ に登録して、ベータの参加表明をするとかたしかチェックボックスがあったかもしれない。いずれにせよAt Own Riskである。

また、EdgeRouter Xのストレージは今や狭小住宅なみに少ないので、古いイメージの削除をしてから入れないとファームのアップグレードができない。つまり、EdgeRouter Xは実行中のファームの他にもう一つのファームしか入れられないことに注意。

詳しくはココを必ず参照

もちろんファームの適用前には、必ずコンフィグをファイルとテキストでバックアップしておくこと!!!


ベータフォーラムからかいつまんで新機能を説明すると(個人的な偏見も含むが)

* [Ssh-recovery] -

This is a new service which starts during early boot stage and provides emergency SSH access via IPv6 link-local address. ssh-recovery can be used to access shell from a directly connected neighbor if a router is not accessible by normal means. By default ssh-recovery service is listening on port 60257 on all ethernet interfaces and it is automatically terminated 60 seconds after start. More information is available in this article.

* [FlowAccounting] -

Added flow-accounting via ipt-netflow which performs better (+25% max throughput) comparing to original pmacct netflow implementation. This ipt-netflow can be configured in CLI with set system flow-accounting-ipt ...

* [DHCP] -

Add static ARP support for DHCP-leased IPs with "set service dhcp-server static-arp"

Add global DHCP client options to configuration (set interfaces ethernet eth0 dhcp-options global-option xxx).

* [Firewall] -

add a contiguous option to firewall time extension "set firewall name xxx rule yyy time contiguous..."

*[System] -

coredumps will not be generated anymore unless explicitly enabled with "set system coredump enabled"

* [Ubnt-discover] -

Add CLI command to disable "ubnt-discovery" daemon, thus ER will stop responding to discovery messages on 10001 UDP port. (set service ubnt-discover-server disable). Discussed here

* [BGP] -

Add support for BGP extended community that allows setting 4-byte AS numbers (set policy route-map xxx rule 42 set extcommunity rt 1234567:3200). Discussed here.

となる。数日中にリリースすれるものと思われる。

2/02/2018

Raspberry Pi 3でRoonとSpotify Connect

おくらばせながらRaspberry Pi 3を買った。どれがいいかわからなかったので、これ。

ちなみに、RS社製(UKあるいは日本のSonyの工場製)とElement 14(中国製)があるが、まぁ、安い買い物なので、Element 14製を購入。

無線LANもついている。LANポートは利用せず。ついでに電源アダプタも買った。別に携帯のでもよかったのだが、電源がシビアなので動作保証が取れているものを選択。


SDカードも32GBも買ったが実際は多分8GBくらいで十分。そもそもRaspberry PIでX Windowグリグリとかおかしいだろうというのが持論。あくまでも組み込み機器コントローラーという感じ。

MACで作成するのでイメージ書き込みソフト(etcher)とDebianベースのOS(Raspbian Jessie Lite)を事前に用意しておく。

EtcherでRaspbian Jessie Liteを焼き込み、焼き込みが終わったら一度SDカードを抜き差ししておく。

ターミナルを立ち上げて以下を実行。(SSHの有効化と無線LANの設定。無線LANは、11aとかには対応していないので注意!)

touch /Volumes/boot/ssh
cat << EOF > /Volumes/boot/wpa_supplicant.conf
country=JP
ctrl_interface=DIR=/var/run/wpa_supplicant GROUP=netdev
update_config=1
network={
    ssid=“SSID"
    psk=“PSKのキー”
}
EOF

これが終わればSDカードをRaspberry PIに刺して起動。SSHでログインができるにはしばしお時間がかかる。SSHするホスト名やIPアドレスがわからないが、raspberrypi.localでアクセスできるはず。

以下のコマンドをターミナルで実行

ssh pi@raspberrypi.local
パスワードはraspberry

そのまま以下を実行
sudo -i
raspi-config


* 4 Localisation Optionsを選択。
* I1 Change Localを選択。
* en_GB.UTF-8 UTF-8でスペースを押して*を外す。
* en_US.UTF-8 UTF-8でスペースを押して*を付ける。
* Default local for the system environment:でen_US.UTF-8を選択。

ちなみに、日本語のロケールも選択してもいいが、組み込みで別に日本語である必要もないので、英語だけ。

以下、何気にハードウェア乱数の設定やwatchdog timerの設定もついでに行なっている。使えるものはなんでも使おう。ただそれだけ。また、途中でファームもあげている。

cat << EOF >> /etc/environment
LANG=en_US.UTF-8
LC_ALL=en_US.UTF-8
EOF

cat << EOF > /etc/asound.conf
pcm.!default {
type hw
card 1
}
EOF

cat << EOF >> /etc/systemd/timesyncd.conf
NTP=jp.pool.ntp.org
FallbackNTP=time.google.com
EOF

cat << EOF >> /etc/rc.local
/opt/vc/bin/tvservice --off
EOF

cat << EOF >>/boot/config.txt
dtparam=watchdog=on
EOF

cat << EOF >> /etc/modprobe.d/bcm2835-wdt.conf
options bcm2835_wdt nowayout=1 heartbeat=10
EOF

exit


sudo raspi-config nonint do_camera 0
sudo apt update ; sudo apt -y upgrade
sudo apt-get install rng-tools watchdog l libavahi-compat-libdnssd-dev
vi /etc/watchdog.conf
以下を修正
watchdog-device = /dev/watchdog
max-load-1 = 24

cat << EOF >> /etc/watchdog.conf
watchdog-timeout = 14
EOF

vi /etc/default/watchdog
以下を修正
watchdog_module="bcm2835_wdt"
vi /lib/systemd/system/watchdog.service

以下をコメントアウト
OnFailure=wd_keepalive.service

bug fixのために以下を修正
[Install]
WantedBy=multi-user.target

sudo update-rc.d watchdog defaults
sudo systemctl enable watchdog
sudo systemctl start watchdog
sudo systemctl status watchdog

sudo rpi-update
sudo apt-get autoremove
sudo apt-get cleansudo reboot


再起動して、再度SSHで接続。RoonとSpotifyの設定は以下。

#Roon Bridge
curl -O http://download.roonlabs.com/builds/roonbridge-installer-linuxarmv7hf.sh
chmod +x roonbridge-installer-linuxarmv7hf.sh
sudo ./roonbridge-installer-linuxarmv7hf.sh


#Spotify connect
curl -sL https://dtcooper.github.io/raspotify/install.sh | sh
sudo vi /etc/default/raspotify
  BITRATE="320"
  OPTIONS="--device=plughw:1"
sudo systemctl restart raspotify


ざっと書いたが以上


EdgeRouter覚書

EdgeRouterの使い方といえば、ここのリンクを読めば大抵設定が可能だが、自分が調べた覚書。

EdgeRouterの設定を保存する

GUIから保存すると、/configの中身をtarで固めてダウンロードしてくれるのだが、設定内容が全く不明。なので、設定保存後、以下のコマンドを実行して、テキストを保存しておく。

root@ubnt:~# /opt/vyatta/sbin/vyatta-config-gen-sets.pl /config/config.boot

set firewall all-ping 'enable'
set firewall broadcast-ping 'disable'
set firewall ipv6-receive-redirects 'disable'
set firewall ipv6-src-route 'disable'
set firewall ip-src-route 'disable'
set firewall log-martians 'enable'
set firewall name WAN_IN default-action 'drop'
set firewall name WAN_IN description 'WAN to internal'
set firewall name WAN_IN rule 10 action 'accept'
set firewall name WAN_IN rule 10 description 'Allow established/related'

長いので省略。。。

この書式があれば、設定を手動で登録するときに便利だし、変更箇所もdiffで確認可能

SSHのキーを送る

sshでログインする際、パスワードの入力が異様にたるい(40代)。なので、いつもssh-copy-idでsshのキーを送りつけてからログインをする。

まず、.ssh/configに以下を設定(.ssh/configの使い方は他に譲るが。。。)

Host <EdgeRouterのLAN IP>
Hostname <EdgeRouterのLAN IP>
User <EdgeRouterのusername>

次に、以下のコマンドを接続元で実行

sftp <EdgeRouterのusername>@<EdgeRouterのLAN IP>
cd /tmp
put .ssh/id_rsa.pub

次にEdgeRouterで以下のコマンドの実行

ssh <EdgeRouterのusername>@<EdgeRouterのLAN IP>
configure
loadkey <EdgeRouterのusername> /tmp/id_rsa.pub
commit
何も変更点がなかったというメッセージが出るが気にしない
save

これでssh <EdgeRouterのLAN IP>でログイン可能

それくらいかなぁ。

2/01/2018

EdgeRouter 4ベンチマーク

EdgeRouterのWeb UIにはこんなツールが付いている。

NewImage

選択するとこんな画面になる。

NewImage

さて、ここに何をいれるかというとiperfのサーバのIPを入れる。

まずは、ここいらの公開iperfサーバで実験。IPアドレスしか入れられないので、ホスト名からIPアドレスに変換してから入れる。

NewImage

結果はこう。。。インドネシアですからねぇ。

NewImage

だいぶお役御免のMac Miniにiperfを入れる。ここからダウンロード

こんな感じで実行。

./iperf3 -s

以下のメッセージが表示されればOK

Server listening on 5201

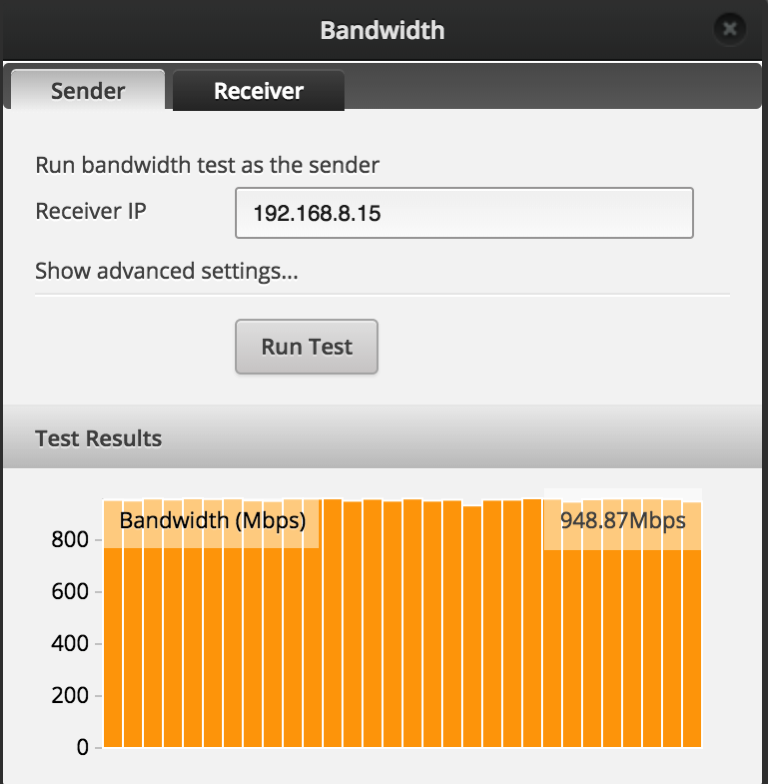
同じように実行してみる。ほぼ1Gbps。でかしたw

NewImage

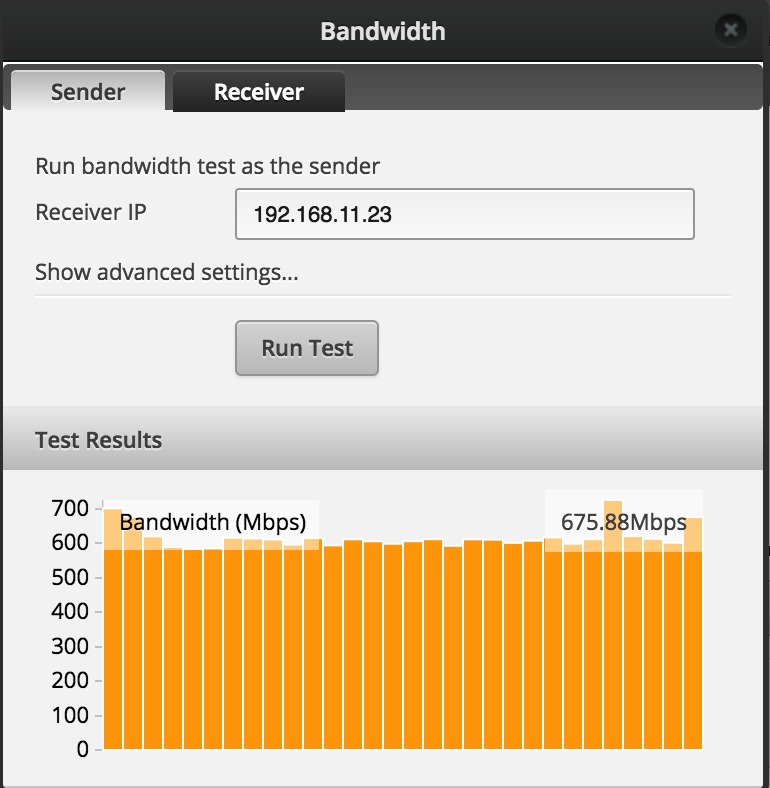
ちなみに、VLAN超えで、Linux仮想マシン(1vCPU/2GB)に対しておこなったもの。

NewImage

まぁ、いろいろ遊べる。仕事でつかっているんだけど。自腹だからいいかなぁと。それにしても電気代が酷いことに。

1/30/2018

EdgeRouter 4ゲット

またしても久々の投稿。

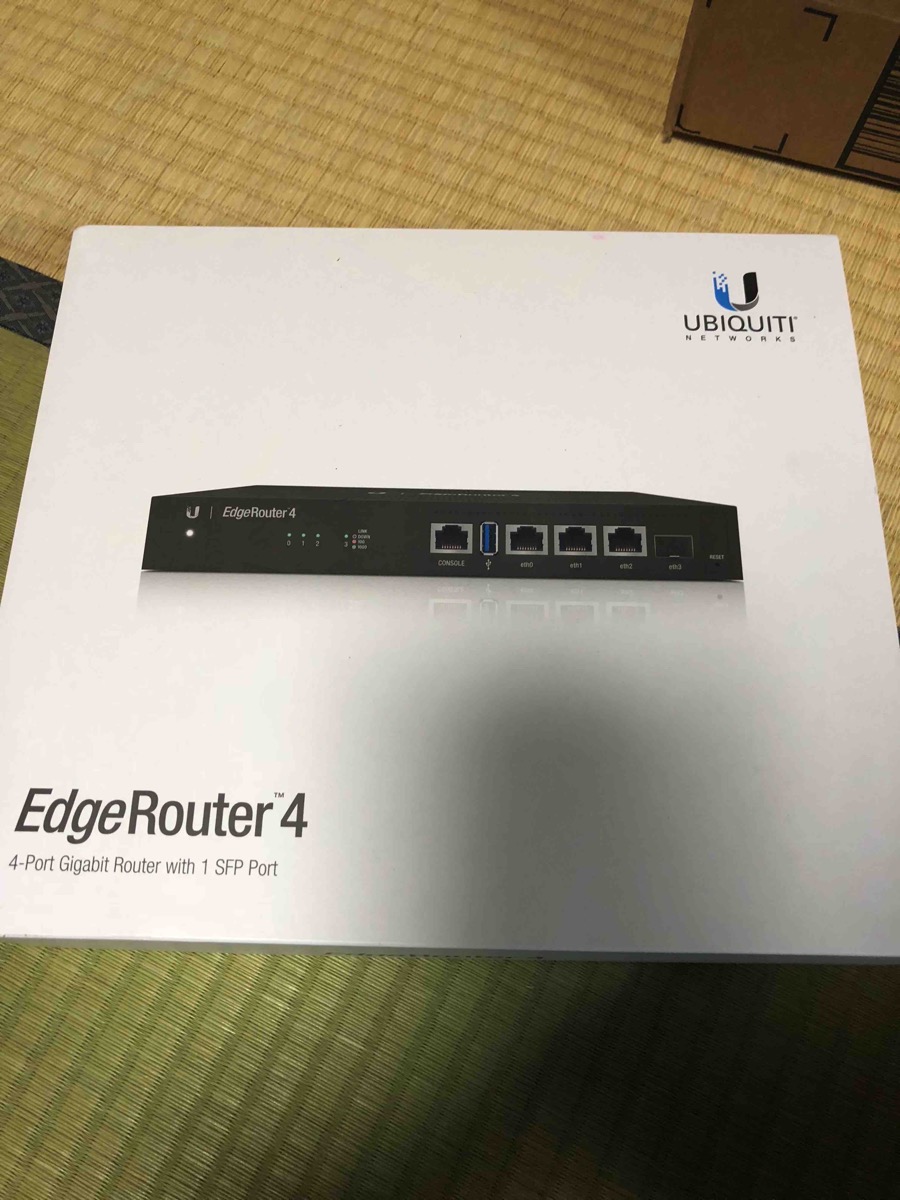
EdgerRouter 4をゲット

ベンダーのショップでは売り切れだったがUS Amazonでは買えた。

IMG 6617

IMG 6618

ベンダーページ

https://www.ubnt.com/edgemax/edgerouter-4/

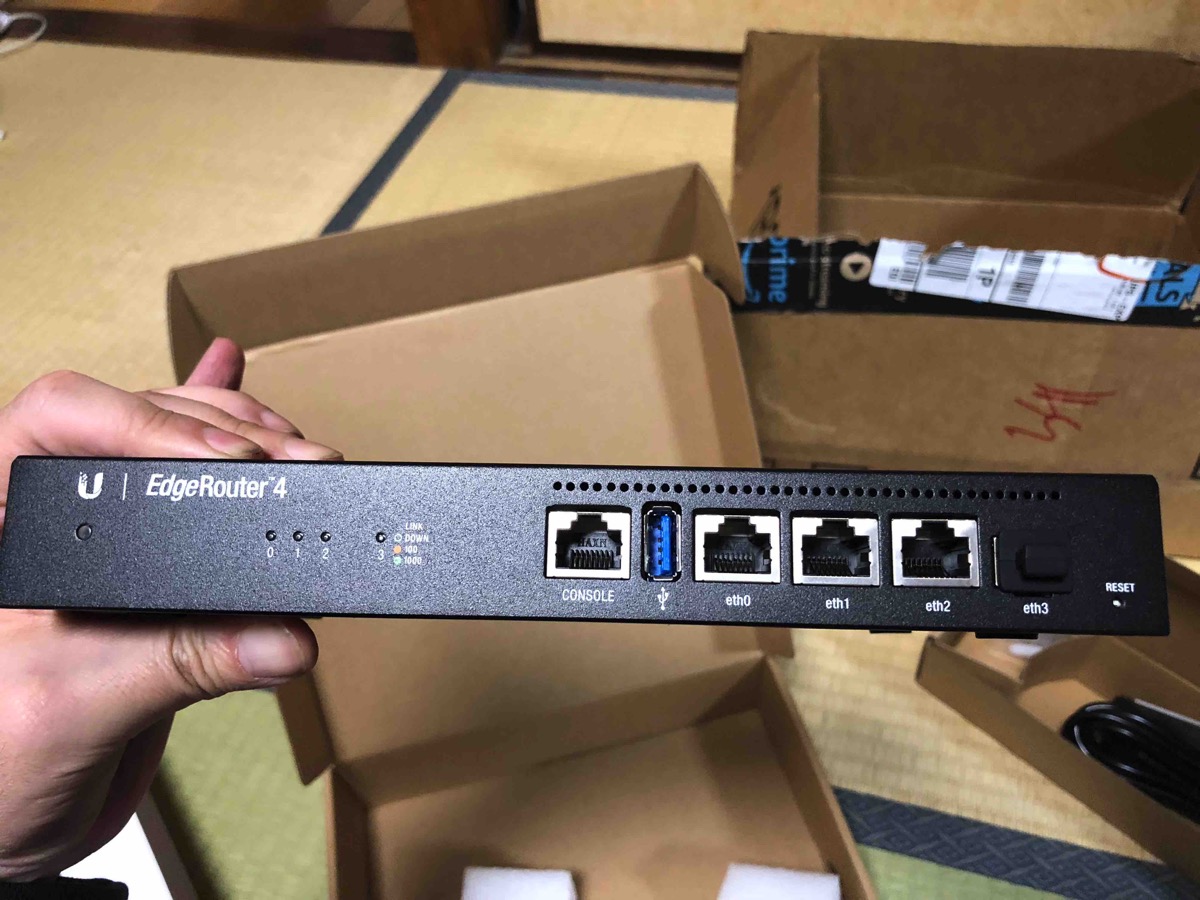
今まで使っていたER-Xとの違いは、CPUのコア数、周波数、メモリ、ストレージサイズが大幅アップしたためThroughputが4倍(価格も4倍)、ただし、ポート数は減少で、ADアダプタから電源コードになっ た。パッとみるとそれくらい。

コンソールポートが付いたのも大きい。USB端子は謎。OSからはこんな感じで見えている。

root@ubnt:~# ls /sys/bus/usb/devices/
1-0:1.0 2-0:1.0 3-0:1.0 4-0:1.0 usb1 usb2 usb3 usb4

ちなみに内蔵ドライブはSDカードっぽい。


ただし、内部的には、

● Switchインタフェースの設定がなくなる。

●VPNの設定が少し変わる

●ハードウェアオフロードができる種類が増える

●MTU9000が設定可能

という違いがある。EdgeRouterの上位機種と同じかと思われる。Switchインタフェースの設定が無いのは少し残念だが、今は安くVLANサポートしているスイッチが出ているので、餅は餅屋にしてもいいかなと。

VPNの設定は、前の環境のままを入れても動かなくて、以下を参照する。

https://help.ubnt.com/hc/en-us/articles/204950294-EdgeRouter-IPsec-L2TP-Server

Devices used in this article:
EdgeRouter-4

とわざわざ書いてあるくらいだからまぁ何かが違うのだろう。ちなみに、EdgeRouter 4のファームは、1.9.8だが、ER-Xの1.9.7 hotfix 2からの作成の様子。hotfix3とhotfix4の修正はどうなった?

ハードウェアオフロードはこんな感じ

ubnt:~$ show ubnt offload

IP offload module : loaded
IPv4
forwarding: enabled
vlan : enabled
pppoe : disabled
gre : enabled
IPv6
forwarding: disabled
vlan : disabled
pppoe : disabled

IPSec offload module: loaded

Traffic Analysis :
export : enabled
dpi : enabled
version : 1.302

ここに書かれているipsecのバグは発生していない様子。ちゃんとVPNが利用できた。

ちなみにUIはこんな感じ。何も変わらず。

EdgeRouterUI

利用感だが、VLANを30近く設定しているが、リブートもかなり早くなり(ER-Xの時は30分!、EdgeRouter 4では5分程度)、ハードウェアオフロードのせいか、Throughputのせいかわからないけど、ネットワークがめちゃくちゃ快適に。値段性能的にもYAMAHAのルータよりもお買い得は変わらない。